Wednesday, September 25, 2013

Convert images in Black & White

Drinking cat - B&W image - photo by ClaudioTodaro.com
A B&W image by Claudio Todaro
Most of us love black & white pictures, they are part of our memories and they are an artistic expression. How can we transform the pictures from our digital camera to B&W?
The first and quickest way is to set our camera in B&W mode, this is quick, this works but it has a very important downside, it is very difficult to add the colours later on.
In my opinion, it is much better to have the option to choose the best between two different kind of colour grades in postproduction instead to have just one kind of image type.


Therefore, the other most effective way is to use one of the many photo editing software (GIMP, Photoshop, Elements...) to change the "Saturation" value to "-100" (or "zero" -  this value is related to the software of your choice).
Please find an example below.

                                               Before                                                After
Saturation setting to trasform a colour image in B&W - photo by ClaudioTodaro.comSaturation setting to trasform a colour image in B&W - photo by ClaudioTodaro.com

Once the "Saturation" has been set then we can change other parameters such as "Exposure", "Temperature", "Tint" and "Contrast", accordingly with the actual image and our personal taste.

For example, moving the "Tint" cursor/value from one side to the other we will notice how the density of the image increase or decrease.

Please find below the final result of the above example:

Brighton in B&W - photo by ClaudioTodaro.com
B&W from colour image - photo by Claudio Todaro

I hope you enjoyed this simple and short article related to B&W image conversion.
Feel free to follow this blog and ask any questions... remember that answer is not granted


Saturday, September 7, 2013

Sony Smartphone Lenses - QX10 & QX100


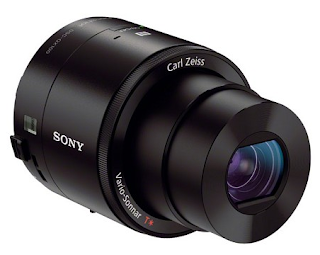
Sony QX100 lens turns your smartphone into a professional DSLR
QX100 lens turns your smartphone into a professional DSLR
When I first read about something new from Sony I was honestly very skeptical, it is because the last few years of Sony products and marketing. In the last ten years Sony has been able to lost the leadership in all the main markets and technologies (except maybe for the game consoles, PlayStation). This time instead Sony come up with something really innovative and appealing.
Bluetooth lenses that we can use plugged to our smartphones, Android or Apple, or remotely using the Bluetooth or NFC technologies to pair them  our devices.


These lenses, the QX10 and the QX100, have been  presented during IFA electronics fair in Berlin and the details are as following:

QX10 = f/2.3-5.9 lens and 18 megapixel sensor - probable cost about £180.00
QX100 = f/1.8-4.9 Carl Zeiss lens and 20.2 megapixel sensor - probable cost about £400.00

Sony QX10 lens turns your smartphone into a semi-professional DSLR
QX10 lens turns your smartphone into a semi-professional DSLR

The comfortable use of this portable lens can really change the photography vision and way to take pictures, especially for old people like me used to move around a studio with an heavy 6X6 Pentax. Using these lenses remotely will be possible to explore new angles and possibilities. Creativity will be more free to express itself and probably we will be able to plug those lenses to our laptops/tablets/PCs too.


I add to the article this short but enjoyable video from Sony. The video shows as comfortable and easy could be to take high quality images in any circumstances.


Feel free to follow this blog and ask any questions... answer is not granted.

by Claudio Pertini


Thursday, September 5, 2013

PHOTOSHOP retouch gone wrong

 Retouch - Photoshop or Gimp are amazing software that help to improve the images quality
Magic Hands
Photoshop or Gimp are amazing software that help to improve the images quality.

The results could be really satisfactory but as per any software/application from a wonderful instrument the human kind can create abominations, monsters or just funny images.

Please find a few of them on this post. I hope they will make you smile and I hope these will help you to think while you retouch the pictures, fingers crossed we will not find our images any soon on this post ;)


 Retouch - Photoshop or Gimp are amazing software that help to improve the images quality
Extraordinary Muscles 
 Retouch - Photoshop or Gimp are amazing software that help to improve the images quality
How to Improve your Popularity

  Retouch - Photoshop or Gimp are amazing software that help to improve the images quality
New Bag Design - Invisible
  Retouch - Photoshop or Gimp are amazing software that help to improve the images quality
When one is not enough
  Retouch - Photoshop or Gimp are amazing software that help to improve the images quality
A Voluntary Disaster?

 Retouch - Photoshop or Gimp are amazing software that help to improve the images quality
When the Press makes a Mess

 Retouch - Photoshop or Gimp are amazing software that help to improve the images quality
Love is not always accepted as it is

I hope you enjoyed these catastrophic retouching, please feel free to post your experience or other funny/horrible pictures.

I have to thank the following websites from where I took the images:

http://www.psdisasters.com (aka photoshopdisasters.blogspot.com )

Feel free to follow this blog and ask any questions... answer is not granted.

by Claudio Pertini

Thursday, August 15, 2013

Writing with light = PHOTOGRAPHY

Light control in Singapore - photo by Claudio
Light control in Singapore - photo by Claudio Todaro
Writing with the light, this is the meaning of photography and so the most common and ugly mistake in photography are related to the miss-knowledge of light. Even the blur images are often a consequence of this.
Most of the people that use a camera thinks that pushing the shutter button is enough to get a good picture. Well, thanks to technology, digital cameras and a pinch of luck, this is possible  but light can always surprise us, in a good or in a bad way.


To control light we must apply the correct balance between shutter speed - aperture - ISO

The perfect balance is related to type of photo we are trying to achieve. For example for sport/action/children/animals image we will give priority to the "shutter speed" and set the other two elements accordingly. Instead if we want to control the DOF (depth of field) then we will concentrate on the "aperture", more open is the aperture (the value is related to the lenses we use), for example f 3.5, less is the DOF and more is the light is coming in the camera, the clarity of the picture will be restricted to the point where we focus. If we want a to have a long table of people all perfectly clear the most simple way obtain a decent result is to focus just before the middle of the table, set the aperture to a close value, for example f 16 (don't take this value literally because light lead the choice), and then we need a suitable "shutter speed", why suitable? because more people is in the image highest is the risk that someone is moving. Then we check our camera exposimeter (if there is any) otherwise just follow the camera suggestions when you select the "aperture priority" setting.


ISO follows light, more light less ISO value needed, less light higher is the ISO value required.
Have you doubts? Questions? Need more information? Then write me in here or use a search engine to find a your answers. You will be welcome to ask but remember answer is not granted.


Horse Race sport shot in Windsor UK - photo by Claudio Todaro
Depth of Field in Batu Caves, Malaysia - photo by Claudio Todaro
Depth of Field example in Batu Caves, Malaysia - photo by Claudio Todaro
Depth of Field example in Trapani, charity dinner, Italy - photo by Claudio Todaro
Depth of Field, London Zoo, UK - photo by Claudio Todaro


Wednesday, August 14, 2013

Photography - the Best and the Worst

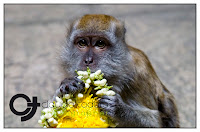
Monkey at Batu Caves in Malaysia by Claudio Todaro
As per any respectful so called photographer I will start this blog talking about myself :)

 No, the one showed in the beside portrait is not me.
I took this picture in Malaysia, Batu Caves, a very interesting and colourful location. This was taken inside the main giant cave where the main temple is located.

I have been working in photography for more than 20 years, I am 40 now so you can understand that this is a very long long commitment. I worked in different type of environments and I thought photography in different countries around the world. I can say that I have got a certain experience to judge the technical quality of the images. Photography is an art and so we can have beautiful extremes or horrible results. If you are interested in my opinion about your work send your images over and I will check them out.
The photography work is awesome... when it is well done and better when it is well paid. Unfortunately these qualities often are not associated.
If you want to have my opinion regarding your pictures, please, send them to me. In your post/email please specify if you want to remain anonymous or if I can publish your name. I will be honest and probably I will publish them on this blog. I will be your honest photography consultant.

Feel free to follow this blog and ask any questions... answer is not granted.

Saline (salt fields) with Flamingos in Trapani, Italy - photo by Claudio Todaro


Model in London UK. checking the perspective and the composition, photo by Claudio Todaro
Model in London UK. photo by Claudio Todaro

Mother with baby, murale as background, in Notting Hill - by Claudio Todaro
Mother with baby, murale as background, in Notting Hill - photo by Claudio Todaro